Craving the vibrant flavors of Mumbai street food? You can recreate the iconic Mumbai pav bhaji recipe in your own kitchen. Achieving that authentic taste involves more than just following instructions—it's about understanding the nuances of spices, textures, and the heart of Mumbai's culinary scene.
At a Glance:
- Master the art of the perfect bhaji blend with the right vegetables and cooking techniques.
- Learn the secrets to achieving that signature buttery, tangy flavor.
- Discover how to toast pav to perfection for an authentic Mumbai experience.
- Explore variations to customize your pav bhaji to your taste.
- Troubleshoot common mistakes and refine your recipe for consistent results.
The Soul of Pav Bhaji: Understanding the Key Elements
Mumbai pav bhaji isn't just a dish; it's an experience. Several factors contribute to its signature flavor profile:
- The Masala: The spice blend is crucial. It provides the distinctive aroma and taste that defines pav bhaji. You can Make your own masala. for a truly customized experience, or use a high-quality store-bought blend.
- The Vegetables: The blend of vegetables, typically including potatoes, cauliflower, peas, and tomatoes, creates the base of the bhaji. The quality and preparation of these vegetables significantly impact the final flavor and texture.
- The Butter: A generous dose of butter is non-negotiable. It adds richness, depth, and that characteristic glistening sheen to the bhaji.
- The Pav: Soft, fluffy pav, toasted in butter and sometimes sprinkled with pav bhaji masala, is the perfect accompaniment to the spicy bhaji.
Crafting the Perfect Bhaji: A Step-by-Step Guide
Here's a detailed breakdown of the process, including key considerations at each step:
1. Preparing the Vegetables:
- The Core Trio: Potatoes, cauliflower, and peas form the foundation. Use about 3 medium potatoes, 1 cup chopped cauliflower, and 1/2 cup of green peas per serving for a good balance.
- The Aromatic Base: Finely chop 2 medium onions, 4 large tomatoes, and 1 capsicum (bell pepper). These will create the flavour base.
- Boiling & Mashing: Boil the potatoes, cauliflower, and peas together until they are soft. Mash them coarsely, leaving some texture for a more authentic feel. Avoid over-mashing into a puree. A little chunkiness adds character!
2. Building the Flavor Base: - The Butter Foundation: Heat 2 tablespoons of butter and 2 tablespoons of oil in a large pan or kadai (wok). The oil prevents the butter from burning.
- Sautéing the Aromatics: Add the chopped onions and sauté until golden brown. This step is crucial for developing a deep, complex flavor. Don't rush it!
- Ginger-Garlic Power: Add 1 tablespoon of ginger-garlic paste and cook until the raw smell disappears.
- Capsicum Addition: Stir in the chopped capsicum and sauté for 2 minutes. This adds a slight sweetness and crunch.
- Tomato Transformation: Add the chopped tomatoes and cook until they become soft and mushy, and the oil starts to separate. This process releases the natural sweetness and acidity of the tomatoes. This may take 8-10 minutes.
3. The Masala Magic: - Spice Infusion: Add 2 tablespoons of pav bhaji masala, 1 teaspoon of Kashmiri red chili powder (for color and mild heat), and 1/2 teaspoon of turmeric powder.
- Roasting the Spices: Cook the masala for 2-3 minutes until the raw smell disappears and the mixture becomes fragrant. This is where the signature Mumbai flavor develops! Be careful not to burn the spices.
4. Integrating the Vegetables: - Combining Flavors: Add the mashed potatoes, cauliflower, and peas to the masala. Mix well, ensuring that all the vegetables are coated with the spices.
- Consistency Control: Pour in 1 cup of water (adjust as needed) and let it simmer for 5-7 minutes, mashing continuously to achieve the desired consistency. The bhaji should be thick but not dry. Add more water if needed.
- Salt and Acid: Add salt to taste and 1 tablespoon of lemon juice to balance the flavors.
5. The Butter Finish (Mumbai Secret): - The Final Flourish: Add the remaining butter (about 50g or more, depending on your preference) and mix well. The bhaji should be glistening with butter. This final addition of butter is what truly elevates the dish.
- Garnish: Garnish with fresh coriander leaves.
Toasting the Pav: Achieving Golden Perfection
The pav is just as important as the bhaji!
- The Slice: Slice the pav buns horizontally (don't cut through completely).
- The Butter Bath: Heat a tawa/griddle, add butter.
- The Toast: Place pav buns cut-side down and toast until golden and crispy.
- Masala Sprinkle: Sprinkle a pinch of pav bhaji masala on the buttered side for extra flavor.
Variations: Customize Your Pav Bhaji Experience
Pav bhaji is incredibly versatile. Here are some popular variations:
- Cheese Pav Bhaji: Add grated cheese (cheddar, mozzarella, or processed cheese) on top of the hot bhaji.
- Paneer Pav Bhaji: Add cubed paneer in the last 5 minutes of cooking the bhaji.
- Jain Pav Bhaji: Skip onions and garlic, and add extra tomatoes. Some also use raw bananas in place of potatoes.
- Khada Pav Bhaji: Don't mash the vegetables completely; keep them chunky. This offers a different textural experience.
- Kolhapuri Pav Bhaji: Add Kolhapuri masala for a spicier kick. Be warned, this one is fiery!
Troubleshooting Common Pav Bhaji Problems
- Bhaji Too Sour: Add a pinch of sugar or a small amount of baking soda to neutralize the acidity.
- Bhaji Too Bland: Add more pav bhaji masala, red chili powder, or amchur (dried mango powder).
- Bhaji Too Dry: Add more water or vegetable broth to achieve the desired consistency.
- Bhaji Lacks Depth of Flavor: Sauté the onions and tomatoes for a longer time to develop a deeper flavor base. Ensure your pav bhaji masala is fresh!
Practical Playbook: Making Pav Bhaji Like a Pro
- Prep Ahead: Chop all the vegetables in advance to streamline the cooking process. You can even boil and mash the potatoes, cauliflower, and peas a day ahead.
- Taste as You Go: Continuously taste the bhaji and adjust the seasoning (salt, chili powder, pav bhaji masala) as needed.
- Don't Skimp on Butter: Butter is essential for the flavor and texture of pav bhaji. Don't be afraid to use a generous amount!
- The Right Tools: A good potato masher and a large, heavy-bottomed pan are essential for making pav bhaji.
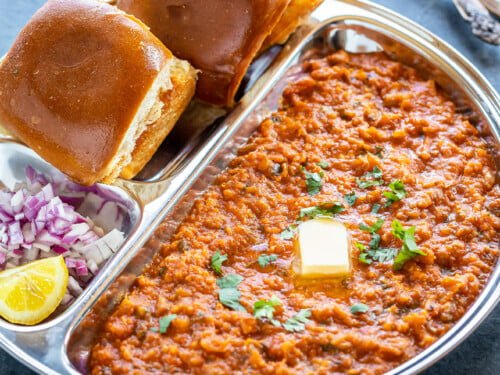
- Serving is Key: Serve the hot bhaji immediately with buttered pav, chopped onions, a lemon wedge, and fresh coriander for the complete Mumbai street food experience.
Quick Answers: Your Pav Bhaji FAQs
Q: Can I use frozen vegetables?
A: Yes, frozen peas and cauliflower work well. Just be sure to thaw them before using. However, fresh vegetables generally yield a better flavor.
Q: Can I make pav bhaji without onion and garlic?
A: Yes, for a Jain-style pav bhaji, simply skip the onion and garlic. Add extra tomatoes for flavor.
Q: How can I make the bhaji redder in color?
A: Use Kashmiri red chili powder, which adds color without too much heat. You can also create a paste by soaking dried Kashmiri chilies in hot water and grinding them. Avoid artificial food coloring.
Q: Can I make pav bhaji in a pressure cooker?
A: Yes, you can cook the vegetables in a pressure cooker to save time. However, be careful not to overcook them. After pressure cooking, you'll still need to sauté the onions, tomatoes, and spices separately.
Q: What’s the best type of pav to use?
A: Ladi pav, also known as dinner rolls, are the traditional choice. They are soft, fluffy, and absorb the butter beautifully.
Your Turn: Recreate the Mumbai Magic Tonight
Now you're armed with the knowledge to create an authentic Mumbai pav bhaji recipe right in your own kitchen. Remember, the key is to use quality ingredients, pay attention to the details, and don't be afraid to experiment and adjust the recipe to your liking. So gather your ingredients, fire up the stove, and get ready to experience the vibrant flavors of Mumbai!
